Now we’re going to install WordPress, which is the software that will run our new website.
WordPress started out as a tool for blogging, but now it’s a complete Content Management System (CMS). In other words, it’s an easy, user-friendly way to add, modify, or delete content on your website. You don’t need to be a programmer or developer, and you don’t need to know much about HTML or website development to use it. Yay!
You can learn more from the WordPress page on Wikipedia if you’re interested.
Let’s get started!
Accessing the Control Panel (cPanel)
We’re going to install WordPress via our hosting account at Hostgator.com. To get to the right place, we’ll refer back to the email we got from Hostgator after setting up our account a few steps back.
Look for “Your Control Panel:” with a link beside it. (Note: Control Panel is often referred to as “cpanel” for short). Click on that link in your email.

This will take you to the cPanel login screen.

Refer once more to the email from Hostgator to retrieve your login information. Enter your username and and account password in the box and click the Log In button.

Once you successfully login to your cpanel, you’ll be greeted by yet another pop up from Hostgator. Assuming it’s selling you something you probably don’t need, you can simply click the No Thanks link and move on.

You should now be looking at a page full of crazy, colorful (yes, a bit tacky) icons. Don’t worry, we’re going to get rid of them and tidy up the Hostgator dashboard with a simple click or two.
NOTE: If you like the look or just don’t care, move on to the section on “Fantastico De Luxe”.
Click on the Change Style link.

You’ll then have several options from which to choose. I’m going to select the Blue Lagoon. It’s easy on the eyes. Click on your desired layout.

You’ll get a preview pop up window. Click the Apply button in the lower right.

You’ll get a confirmation message that your style has been changed. Click the Home link in the upper right corner to get back to your dashboard.

Hopefully, your dashboard will look much more manageable and less intimidating. If not, you can always revert back or even pick a new look.
Fantastico De Luxe
Fantastico De Luxe is amazing. And not just in name, it does all the difficult work of installing what’s needed to run WordPress. It’s really helped make this whole process available to you and other small business owners and entrepreneurs.
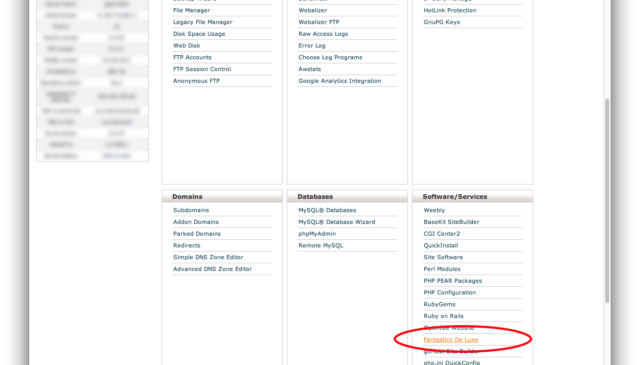
Scroll down to the Software/Services box and click the Fantastico De Luxe link.

You should now see a slightly different dashboard for Fantastico. There are a lot of options here, but we’re only going to use it to install WordPress.
Click the WordPress link in the left column.

Click on the New Installation link to proceed.

You’ll need to fill out a few form fields which will give Fantastico the info it needs to set up WordPress for our new domain. See image below for additional information on each field.
When you’re done, click the Install WordPress button.
NOTE: Do NOT use “Admin” for your username and make sure your password is at least 15 characters and fairly complex. Otherwise, your chances of someone breaking into your site (getting hacked) will go up exponentially.

You’ll get a confirmation screen. Click the Finish Installation button.

You’ll get another confirmation that also reminds you that you’ll need a username and password to access your website. The included username and password are what you entered on the previous screen.
You’ll also get a link to access your website’s admin or dashboard, which will be your domain name /wp-admin/ You may want to bookmark that link or copy and paste it somewhere so you won’t forget it down the road.
Go ahead and click on the admin link and we’ll make sure you can login to your new website.

You should now be looking at the WordPress login area for your own website.
Type in your username and password, and click the “Log In” button in the lower right of the box. Note: If you want your browser to remember your login info, simply click the radio button beside “Remember Me”.

You should now be looking at the Dashboard of your new website.
Depending on when you’re following this guide, your dashboard may look slightly different from the image below. WordPress is continually being updated and improved. Later versions will have a slightly different look, but the core elements will be the same.

If you’re here, then your installation was successful. Woohoo!
Congrats, you have just installed your first website! Let’s take a look at what we have to start with. Hover over your site’s domain name in the upper left corner.
Click the Visit Site link once it drops down.

Once you click the Visit Site link, you should see your website for the first time.
Yes, it’s basic, but hey, it’s there. And YOU did it yourself!

Next Up: How To Set Up Your WordPress Website

